A friend (non-member here) has started to pour sinkers, so I am posting this so he can see the pictures. Perhaps could be useful to members here too.
HOW-TO-POUR LEAD SINKERS AND JIG HEADS 8/8/2012
This How-To information is based on the author’s own experience.
It is intended to be a helpful instruction for anybody who wants to pour lead sinkers, jig heads, or other items using a mold and molten lead.
Lead fumes are harmful to breath. Lead has a melting point of 621.5 F.
It can be dangerous to work with.
By following this instruction the users take full responsibility for their own safety.
Author is held harmless from any damages whether physical or to the property.
Use the information below at your own risk.
General concept; melt lead. Pour lead in a mold. Remove and use. If the pour is not good, put it back in the molten pot. It is very forgiving!
However, the way that the above can be done is important. Most importantly for safety sake and the outcome of the work.
SAFETY
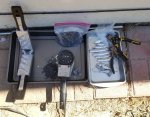
1-The tan mat under the items is a welding mat. Somewhat fire resistant.

The melting operations MUST be done in a WELL ventilated area. I work outdoors on a work table.
The work surface area should be fire proof. I use a ¼” concrete board, known as Hardy Board which is used as a tile backer to install ceramic tiles. Then I put on a welding mat.
http://www.jameshardie.com/homeowner/products_backerboard_quarterInch.shtml
I have one fan blowing at a low speed toward the melting pot, and one with a higher speed close to the melting pot, pointed the other direction and removing any fumes from the pot.
Use of a proper respirator is also recommended. I work outdoors and with the two fans and melting pot I did not needed the respirator.
A pair of safety goggles should be worn when working with molten lead.
A pair of gloves also should be worn. I use a pair of welding gloves.
http://www.harborfreight.com/welding-gloves-39664.html
Long sleeve shirt and/or welding sleeves should be worn. A long pants and leather shoes are also recommended.
http://www.harborfreight.com/18-inch-split-leather-sleeves-40206.html
I also wear a welder’s apron to cover my chest and front torso.
http://www.harborfreight.com/split-leather-welding-apron-45193.html
A pair of needle nose pliers is good for removing the hot cast.
A bucket of ice water will help reduce the heat of any accidental lead splashes and burns. Depending on severity, a Dr. may have to be consulted.
EQUIPMENT
Here is a picture of some of the equipment:
2-Various ways to melt lead. I use the smaller one for softer lead to pour removable split shots.

The electric hot plate is to warm up the mold and small parts. It is not for melting lead.
Lead melting pot
There are many ways to melt lead. You can put the lead ingots in a metal pot or a ladle and use a heating source.
It produces a lot of fumes and handling a hot ladle full of molten lead can be dangerous.
If the lead I receive from Ebay is too big and odd shape, I first melt it using the ladle and the stove.
I use fluxing compound to clean the lead and then pour it in the ingot mold for future use.
I use the larger size Lee electrical melting pot on the left.
http://do-itmolds.com/shop/index.php?route=product/category&path=2055
First I got the smaller version, because it was cheaper. However, it did not have the volume to make a good pour for the larger sinkers or cast.
http://do-itmolds.com/shop/index.php?route=product/category&path=4_188_2056
Since it pours from the bottom, it is much cleaner lead. Also there is very little or no fumes, particularly if you use the two fans setup like I do.
Since the nozzle is under the pot, it can be positioned very close to the mold sprue cavity. Thus, the safety margin is much greater than using flame and ladle full of molten lead.
Another benefit of having the mold cavity so close to the pot nozzle, is that the lead is not exposed too much to the outside air. Consequently, it stays hotter while being poured.
Molds
Do-it Molds is the best known company who makes molds.
http://do-itmolds.com/shop/index.php?route=product/category&path=1_10
With every mold comes a form to be sent in for a free catalog. They also sell molds with no cavity in them. Purchaser can have a machine shop route the desired shape. It could be cost prohibitive if one does not own a milling machine.
I got most of my molds from Ebay. There are lots of used ones on sale at Ebay. Some molds require an additional item to allow production of the proper item.
Be sure to consult the mold manufacture’s catalog before bidding on Ebay.
For example without the “T” copper rod, the egg sinkers would not have a hole in the center of them for the fishing line to go through. The “T” copper rod is shown this way for illustration. During actual pour the mold is closed and the “T” handle is at the hinge side of the mold allowing to be pulled out of the mold after the lead has solidified.
3-The removable split shot sinker mold needs a flat bar to produce the proper sinker.

However, the mold on the bottom of the picture for making another kind of removable split shot does not require any additional parts.
Hilts are another one, though not as well known.
http://www.hiltsmolds.com/
4-A claw sinker, a 1oz. torpedo sinker and a lead head made by Hilts Company.

There is even an $8.00 DVD on Ebay that shows how to make your own molds. I bought one and was not impressed by it.
Lead ingots
I got mine from Ebay. If you get some lead wheel weights (it is outlawed in California for the tire stores to carry them), you can melt them and by using the lead fluxing compound, you can have some clean lead.
To pour some sinkers like the removable split sinkers, a soft type of lead should be used.
5-Some of the lead I bought on Ebay came looking like these.

6-Some of the tools I use.

Lead ingot mold
http://do-itmolds.com/shop/index.php?route=product/category&path=2066
It can be used to pour clean lead after fluxing in it to be used later in the Lee pot.
Lead fluxing
Follow the instructions on the label.
I use a small amount in the pot. Stir and scrape the top layer with an old fork.
http://do-itmolds.com/shop/index.php?route=product/category&path=4_188_2068
This process removes any impurities in the lead. It should be done several times during pouring particularly if a new piece of lead has been added to the pot.
Mold release
http://do-itmolds.com/shop/index.php?route=product/category&path=4_188_2069
You can also use a candle to blacken the mold. It coats the mold with a thin black sooth. Sometimes it is not needed. Just experiment without it first.
I have even read about using PAM cooking spray as a release agent.
Lead is very forgiving. You don’t like the result; just throw it back in the pot. If you have a non-lead item such as a hook or a brass eye, use a pair of long nose pliers to hold that item.
Cautiously then push the lead part in the molten lead. The lead will melt and the “foreign” item is left naked.
Gloves are mandatory for this operation.
Gate cutter pliers
http://do-itmolds.com/shop/index.php?route=product/category&path=4_187_1003
It is used to cut the portion of the cast where the lead is poured in. It is called a sprue. You can also break it free depending on the sinker type.
Metal file
I like to file the area after removing the sprue.
MAKING LEAD SINKERS/JIG HEADS
The first step is to put the lead in the Lee electrical pot and while it is trying to melt the lead, you can prepare the mold/s.
Set the thermostat on the highest setting first, and once the lead is in the liquid form, you can lower it.
When starting the casting operation, increase the setting to make the lead flow easier.
It is best to plug the Lee pot to an electrical outlet with a 20 amp receptacle, connected to a 20 amp circuit breaker.
If you have an outlet outdoors, and it is close to your electrical panel, it would be best.
Plug any fan/s and/or other electrical items to other outlets, connected to other circuit breakers.
It is imperative that the mold and any metal object in the mold, i.e. hook, swivel and brass wire eye be hot before pouring lead.
http://do-itmolds.com/shop/index.php?route=product/category&path=2_118
You could lay the mold on top of the Lee pot, changing sides several times. It works, but only small portion of the mold is in contact with the pot.
You can also use any heat source to heat the mold.
I use a small electrical hot-plate and heat the mold by placing it on the electrical element. Turning the mold over to make sure it heats evenly. I happened to have one, and it worked great for me. You can also position the mold and the inserted none-lead items like hook, eyelet, etc. on the Lee pot to warm up before the first pour and in between pours.
I also use an electrical metal box snap style knockout seal more commonly known as “KO” cover to hold within it the brass wire eyes, or hooks.
The KO cover sits on the heating element, and its’ prongs keep the eyes from falling out.
http://www.platt.com/product.aspx?zpid=152956
7-Any small metal container could be used as well.

Before each casting session, use a small amount of engine oil, or similar lubricant with a small brush to lube the hinges of the mold.
It could help opening and closing the hinge when it is hot and the aluminum mold has expanded.
After inserting the brass eye for sinker, or hook for the jig, heat the mold again for a minute or so.
Another way is to pour some lead in the mold several times without any hook or brass eye. The hot lead will warm the mold. Then insert the hook/eye and heat the mold again.
Keep the mold firmly closed to make sure the hook or the brass eye does not shift from its position.
The newly poured item will be much better if everything was warm and the lead was hot.
When pouring the lead, position the mold under the Lee pot as close to the pour spout as possible.
Lift the knob of the Lee pot and pour molten lead into the first sprue cavity.
Once you see the lead exposed in the sprue cavity, stop. Move to a new sprue cavity and pour again.
When all of the cavities are full, wait for a few seconds, then open the mold.
The lead sets very fast and the mold can be opened right away. Use the needle nose pliers to pull the casting off of the mold.
LET IT SIT UNTOUCHED FOR A FEW MINUTES BEFORE HANDLEING. IT IS HOT.
If you are making several, keep casting and removing the casts, without touching any of the casts.
Once the casts are cooled to touch, the sprue is then cut using the gate cutter, or side cutter pliers and put back into the melted lead. You can also twist the sprue to break it loose. A little touchup with a file will make the broken “wound” clean and professional looking.
A 10-12” section of a metal pipe can act as a “chute” to drop the sprue into the molten lead with hands away from the hot pot.
Stand back and enjoy your creation.
Since it does take some preparation and wait time to melt the lead, I usually make extra casting in one session, rather than many smaller counts during several sessions.
As you get more involved, you may choose to do the process differently than I do. Just remember;
Once you pour one sinker, it can become addictive. I am up to (18) eighteen molds as of this posting.
SAFETY FIRST----- Use the information above at your own risk.
It is most important that at no time any moisture or water be in touch with the molten lead.
Lastly, I do not have any connection to the sellers of products mentioned above. They are just but a few who provide the items listed.
HOW-TO-POUR LEAD SINKERS AND JIG HEADS 8/8/2012
This How-To information is based on the author’s own experience.
It is intended to be a helpful instruction for anybody who wants to pour lead sinkers, jig heads, or other items using a mold and molten lead.
Lead fumes are harmful to breath. Lead has a melting point of 621.5 F.
It can be dangerous to work with.
By following this instruction the users take full responsibility for their own safety.
Author is held harmless from any damages whether physical or to the property.
Use the information below at your own risk.
General concept; melt lead. Pour lead in a mold. Remove and use. If the pour is not good, put it back in the molten pot. It is very forgiving!
However, the way that the above can be done is important. Most importantly for safety sake and the outcome of the work.
SAFETY
1-The tan mat under the items is a welding mat. Somewhat fire resistant.
The melting operations MUST be done in a WELL ventilated area. I work outdoors on a work table.
The work surface area should be fire proof. I use a ¼” concrete board, known as Hardy Board which is used as a tile backer to install ceramic tiles. Then I put on a welding mat.
http://www.jameshardie.com/homeowner/products_backerboard_quarterInch.shtml
I have one fan blowing at a low speed toward the melting pot, and one with a higher speed close to the melting pot, pointed the other direction and removing any fumes from the pot.
Use of a proper respirator is also recommended. I work outdoors and with the two fans and melting pot I did not needed the respirator.
A pair of safety goggles should be worn when working with molten lead.
A pair of gloves also should be worn. I use a pair of welding gloves.
http://www.harborfreight.com/welding-gloves-39664.html
Long sleeve shirt and/or welding sleeves should be worn. A long pants and leather shoes are also recommended.
http://www.harborfreight.com/18-inch-split-leather-sleeves-40206.html
I also wear a welder’s apron to cover my chest and front torso.
http://www.harborfreight.com/split-leather-welding-apron-45193.html
A pair of needle nose pliers is good for removing the hot cast.
A bucket of ice water will help reduce the heat of any accidental lead splashes and burns. Depending on severity, a Dr. may have to be consulted.
EQUIPMENT
Here is a picture of some of the equipment:
2-Various ways to melt lead. I use the smaller one for softer lead to pour removable split shots.
The electric hot plate is to warm up the mold and small parts. It is not for melting lead.
Lead melting pot
There are many ways to melt lead. You can put the lead ingots in a metal pot or a ladle and use a heating source.
It produces a lot of fumes and handling a hot ladle full of molten lead can be dangerous.
If the lead I receive from Ebay is too big and odd shape, I first melt it using the ladle and the stove.
I use fluxing compound to clean the lead and then pour it in the ingot mold for future use.
I use the larger size Lee electrical melting pot on the left.
http://do-itmolds.com/shop/index.php?route=product/category&path=2055
First I got the smaller version, because it was cheaper. However, it did not have the volume to make a good pour for the larger sinkers or cast.
http://do-itmolds.com/shop/index.php?route=product/category&path=4_188_2056
Since it pours from the bottom, it is much cleaner lead. Also there is very little or no fumes, particularly if you use the two fans setup like I do.
Since the nozzle is under the pot, it can be positioned very close to the mold sprue cavity. Thus, the safety margin is much greater than using flame and ladle full of molten lead.
Another benefit of having the mold cavity so close to the pot nozzle, is that the lead is not exposed too much to the outside air. Consequently, it stays hotter while being poured.
Molds
Do-it Molds is the best known company who makes molds.
http://do-itmolds.com/shop/index.php?route=product/category&path=1_10
With every mold comes a form to be sent in for a free catalog. They also sell molds with no cavity in them. Purchaser can have a machine shop route the desired shape. It could be cost prohibitive if one does not own a milling machine.
I got most of my molds from Ebay. There are lots of used ones on sale at Ebay. Some molds require an additional item to allow production of the proper item.
Be sure to consult the mold manufacture’s catalog before bidding on Ebay.
For example without the “T” copper rod, the egg sinkers would not have a hole in the center of them for the fishing line to go through. The “T” copper rod is shown this way for illustration. During actual pour the mold is closed and the “T” handle is at the hinge side of the mold allowing to be pulled out of the mold after the lead has solidified.
3-The removable split shot sinker mold needs a flat bar to produce the proper sinker.
However, the mold on the bottom of the picture for making another kind of removable split shot does not require any additional parts.
Hilts are another one, though not as well known.
http://www.hiltsmolds.com/
4-A claw sinker, a 1oz. torpedo sinker and a lead head made by Hilts Company.
There is even an $8.00 DVD on Ebay that shows how to make your own molds. I bought one and was not impressed by it.
Lead ingots
I got mine from Ebay. If you get some lead wheel weights (it is outlawed in California for the tire stores to carry them), you can melt them and by using the lead fluxing compound, you can have some clean lead.
To pour some sinkers like the removable split sinkers, a soft type of lead should be used.
5-Some of the lead I bought on Ebay came looking like these.
6-Some of the tools I use.
Lead ingot mold
http://do-itmolds.com/shop/index.php?route=product/category&path=2066
It can be used to pour clean lead after fluxing in it to be used later in the Lee pot.
Lead fluxing
Follow the instructions on the label.
I use a small amount in the pot. Stir and scrape the top layer with an old fork.
http://do-itmolds.com/shop/index.php?route=product/category&path=4_188_2068
This process removes any impurities in the lead. It should be done several times during pouring particularly if a new piece of lead has been added to the pot.
Mold release
http://do-itmolds.com/shop/index.php?route=product/category&path=4_188_2069
You can also use a candle to blacken the mold. It coats the mold with a thin black sooth. Sometimes it is not needed. Just experiment without it first.
I have even read about using PAM cooking spray as a release agent.
Lead is very forgiving. You don’t like the result; just throw it back in the pot. If you have a non-lead item such as a hook or a brass eye, use a pair of long nose pliers to hold that item.
Cautiously then push the lead part in the molten lead. The lead will melt and the “foreign” item is left naked.
Gloves are mandatory for this operation.
Gate cutter pliers
http://do-itmolds.com/shop/index.php?route=product/category&path=4_187_1003
It is used to cut the portion of the cast where the lead is poured in. It is called a sprue. You can also break it free depending on the sinker type.
Metal file
I like to file the area after removing the sprue.
MAKING LEAD SINKERS/JIG HEADS
The first step is to put the lead in the Lee electrical pot and while it is trying to melt the lead, you can prepare the mold/s.
Set the thermostat on the highest setting first, and once the lead is in the liquid form, you can lower it.
When starting the casting operation, increase the setting to make the lead flow easier.
It is best to plug the Lee pot to an electrical outlet with a 20 amp receptacle, connected to a 20 amp circuit breaker.
If you have an outlet outdoors, and it is close to your electrical panel, it would be best.
Plug any fan/s and/or other electrical items to other outlets, connected to other circuit breakers.
It is imperative that the mold and any metal object in the mold, i.e. hook, swivel and brass wire eye be hot before pouring lead.
http://do-itmolds.com/shop/index.php?route=product/category&path=2_118
You could lay the mold on top of the Lee pot, changing sides several times. It works, but only small portion of the mold is in contact with the pot.
You can also use any heat source to heat the mold.
I use a small electrical hot-plate and heat the mold by placing it on the electrical element. Turning the mold over to make sure it heats evenly. I happened to have one, and it worked great for me. You can also position the mold and the inserted none-lead items like hook, eyelet, etc. on the Lee pot to warm up before the first pour and in between pours.
I also use an electrical metal box snap style knockout seal more commonly known as “KO” cover to hold within it the brass wire eyes, or hooks.
The KO cover sits on the heating element, and its’ prongs keep the eyes from falling out.
http://www.platt.com/product.aspx?zpid=152956
7-Any small metal container could be used as well.
Before each casting session, use a small amount of engine oil, or similar lubricant with a small brush to lube the hinges of the mold.
It could help opening and closing the hinge when it is hot and the aluminum mold has expanded.
After inserting the brass eye for sinker, or hook for the jig, heat the mold again for a minute or so.
Another way is to pour some lead in the mold several times without any hook or brass eye. The hot lead will warm the mold. Then insert the hook/eye and heat the mold again.
Keep the mold firmly closed to make sure the hook or the brass eye does not shift from its position.
The newly poured item will be much better if everything was warm and the lead was hot.
When pouring the lead, position the mold under the Lee pot as close to the pour spout as possible.
Lift the knob of the Lee pot and pour molten lead into the first sprue cavity.
Once you see the lead exposed in the sprue cavity, stop. Move to a new sprue cavity and pour again.
When all of the cavities are full, wait for a few seconds, then open the mold.
The lead sets very fast and the mold can be opened right away. Use the needle nose pliers to pull the casting off of the mold.
LET IT SIT UNTOUCHED FOR A FEW MINUTES BEFORE HANDLEING. IT IS HOT.
If you are making several, keep casting and removing the casts, without touching any of the casts.
Once the casts are cooled to touch, the sprue is then cut using the gate cutter, or side cutter pliers and put back into the melted lead. You can also twist the sprue to break it loose. A little touchup with a file will make the broken “wound” clean and professional looking.
A 10-12” section of a metal pipe can act as a “chute” to drop the sprue into the molten lead with hands away from the hot pot.
Stand back and enjoy your creation.
Since it does take some preparation and wait time to melt the lead, I usually make extra casting in one session, rather than many smaller counts during several sessions.
As you get more involved, you may choose to do the process differently than I do. Just remember;
Once you pour one sinker, it can become addictive. I am up to (18) eighteen molds as of this posting.
SAFETY FIRST----- Use the information above at your own risk.
It is most important that at no time any moisture or water be in touch with the molten lead.
Lastly, I do not have any connection to the sellers of products mentioned above. They are just but a few who provide the items listed.
") .
.